Sektor User Guide
 Introduction
Sektor is a modern wavetable synthesiser, featuring 2 high quality unison wavetable oscillators, a sub oscillator, a sample oscillator which also supports multi samples, 3 graphical modulation envelopes and a very simple to use routing system for modulation of the synths parameters. Features also include 2 effect racks, 2 filters, 2 ADSRs, 4 LFOs that can be used as sound sources or modulators, a modulation matrix and an advanced sequencer/arpeggiator. Sektor also comes with an expression page which consists of 8 graphical envelopes to shape and route incoming midi messages such as velocity or the mod wheel. Sektor has some advanced customisation features, such as changing the individual colour of many elements on the interface like screen colour, modulation colour, menu colours and much more. The skin can also be changed and the user can create their own skins, Sektor is fully skinable.
Oscillators and the Sample player
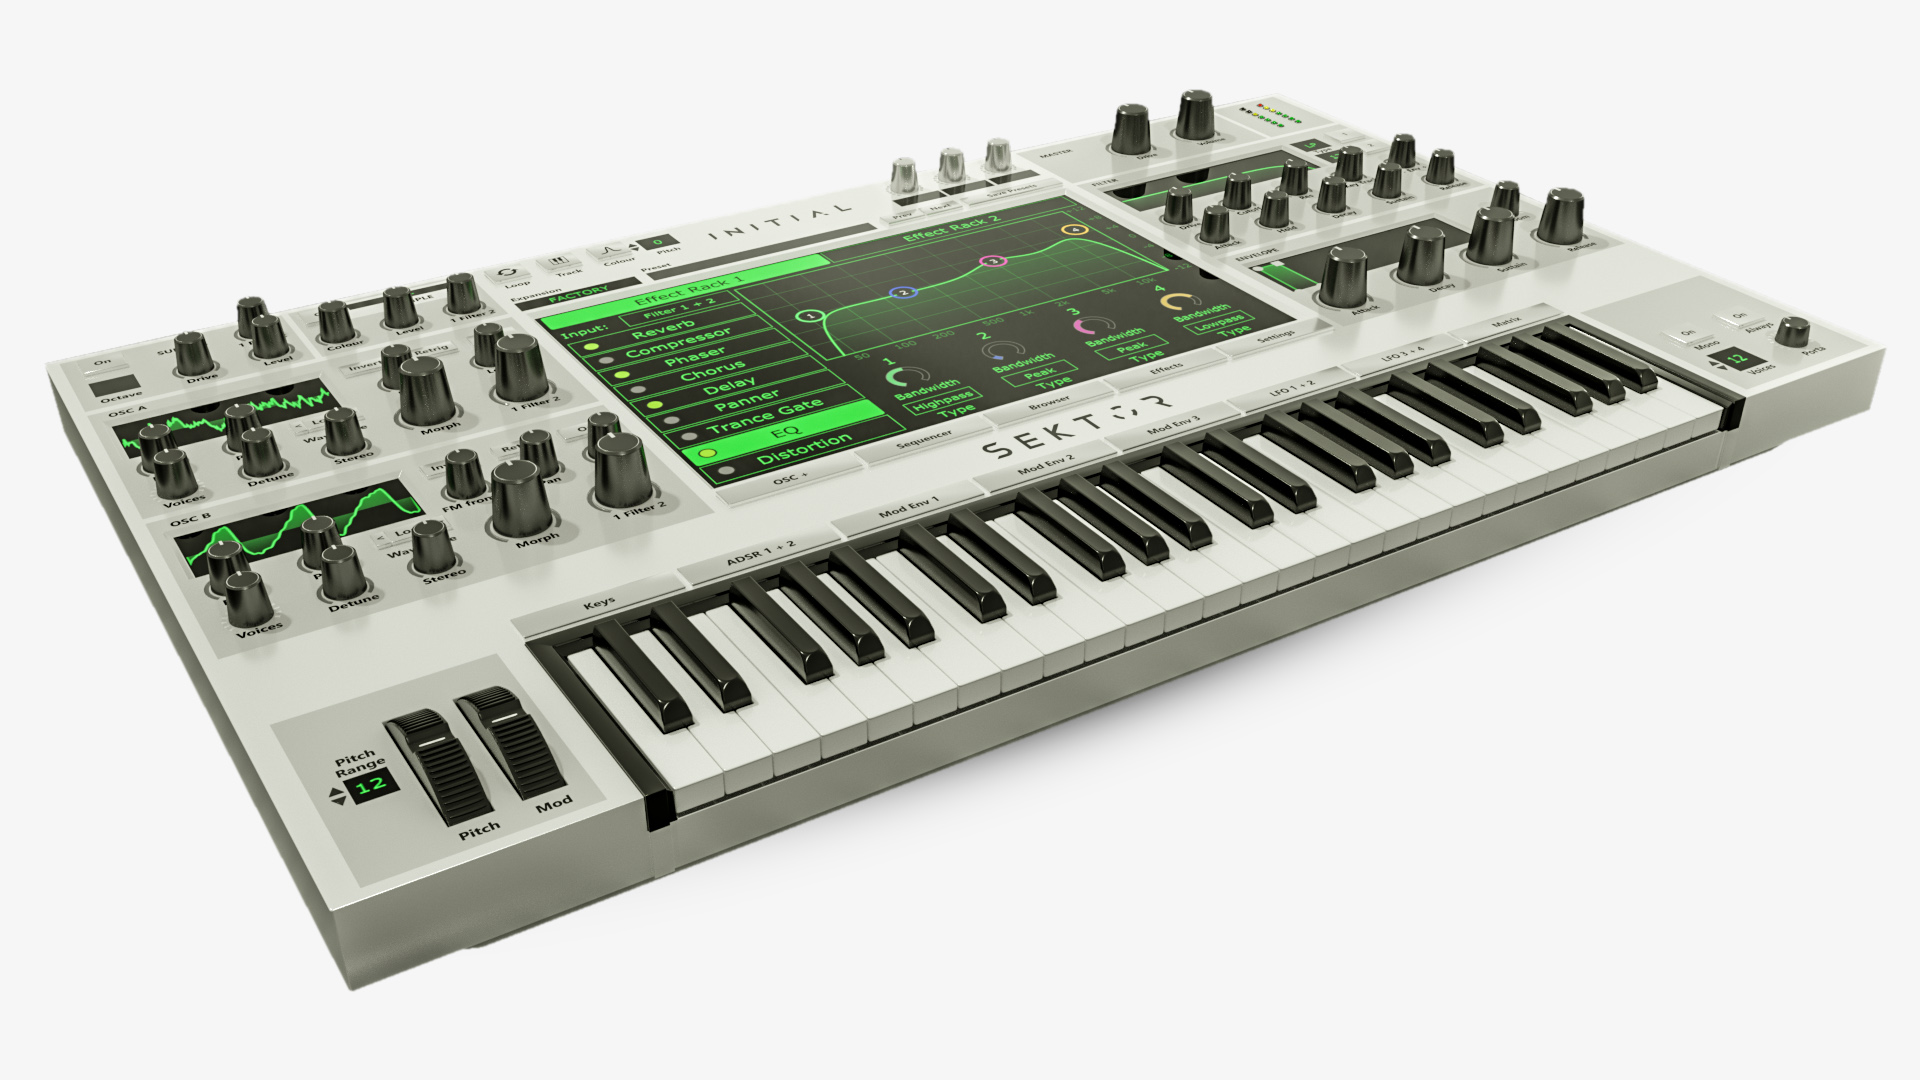
The wavetable oscillators (Oscillator A and B)
Sektor comes with 2 wavetable oscillators. Wavetable synthesis is probably the easiest form of synthesis to create complex and evolving sounds over time. Each oscillator contains a table of waveforms which can be selected via the display or morphed together using the morph control. Many of the wavetables in Sektor are designed for smooth morphing over time, enabling the creation of complex and evolving sounds.
Oscillator Settings: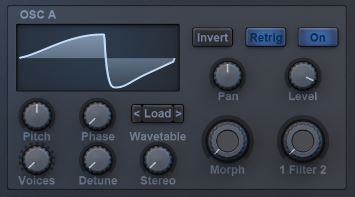
- Waveform Display: Clicking the display opens a popup menu allowing you to see and select a waveform from the current wavetable. When hovering the name of the current wavetable is shown, also previous and next buttons allowing quick changing of the waveform without needing to open the popup waveform menu.
- Wavetable Load: Select a new wavetable to load. Wavetables are multiple waveforms organised into a table. Once a wavetable is loaded select the current waveform to use via the display or morph control.
- Pitch: Detune the oscillator in half notes ( semi tones), 12 is equal to one octave. So for instance pitching the oscillator down 2 octaves is equal to setting the pitch to -24.
- Phase: Change the start position of the waveform.
- Pan: Pan the oscillator to the left or right of the stereo field.
- Level: Attenuate the output level of the oscillator in decibels.
- Invert: Inverts/flips the waveform.
- Retrig: When retrigger is On the phase of the oscillator will reset to the phase position with every new note played. When Off the oscillator will restart from the last phase position it was at when the voice died.
- On: Turn the oscillator On or Off. If you don’t need this oscillator turn it Off rather than bringing the level all the way down to save CPU usage.
- Voices: Number of voices the oscillator will use. Use Detune and Stereo to create a unison effect. Use the Osc + page in the screen to individually set the detune, stereo as well as other parameters for each voice.
- Detune: Detune the voices for a unison effect. Requires Oscillator voices to be set to more than 1 voice to have any effect.

- Stereo: Spread the oscillator voices throughout the stereo field. Requires Oscillator voices to be set to more than 1 voice to have any effect.
- Morph: Sets the position in the wavetable, enables Morphing between the waveforms of the table.
- Filter: Mix the oscillator output between Filter 1 and 2. 100/0 means the output goes completely to filter 1. While 0/100 means the output goes completely to filter 2. Values in between mean the output is mixed between both filters.
- FM < A: (Oscillator B only) FM from oscillator A. Oscillator A is used as a modulator for Frequency modulation of Oscillator B. This setting sets the level of modulation to apply for a more or less noticeable effect. Turn down the level of Osc A so it can no longer be heard if you want to use Osc A only as a modulator for FM.
The Osc+ page
The osc+ page is a really powerful feature that gives extra control over the individual voices of an oscillator. By default this is disabled, to use it first set the voices knob on either oscillator to more than 1. Each oscillator has a maximum of 16 voices. You should think of each voice as its own oscillator. Looking at the grid we see numbers from 1-16, each numbered section represents an oscillator. Here we can set the pitch in semitones of each voice, as well as detune, stereo, phase and level. Giving full control over unison type sounds popular on many synths. We can also change the waveform for each voice in the WT Pos (Wavetable Position) tab, changing the WT Pos will temporarily update the waveform display so you can see exactly which waveform you are setting for that voice.
Important behaviour of the osc+ page: One thing to really understand when using this feature is that it overrides the current settings of the oscillator. If you use the pitch knob to set the pitch to minus -12 but then go into the osc+ page and set some voices to +12 and some to 0, then the overall pitch of the oscillator is no longer -12. The osc+ settings override the settings of the knobs and vice a versa. If you use the knob to set the pitch it will override the settings of the osc+ page, setting all voices to that value. This could be confusing but as a rule of thumb if you change a value in the osc+ page don’t then change the same setting via the knob, unless you wish to override the changes you made. We designed it this way as we figured the majority of users will use the knobs rather than the osc+ page. So the knobs must work as expected affecting all voices of the oscillator. Hence they override the settings of the osc+ page. The Osc+ page is an advanced feature to really dig into shaping the individual voices of the oscillator.
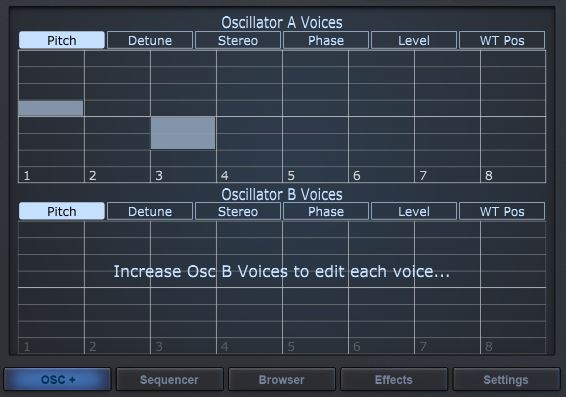
The Sub Oscillator
The sub oscillator is a useful and quick way to add some extra low end bass to a sound. The sub is just a pure sine wave which can be pitched up or down relative to the note played by up to 5 octaves. It also comes with a drive setting to overdrive the sub adding extra harmonics.
Sub Settings:
- On: Turn the sub oscillator On or Off. If you don’t need this oscillator turn it Off rather than bringing the level all the way down to save CPU usage.
- Level: Attenuate the output level of the sub oscillator in decibels.
- Octave: Pitch the sub up or down, up to 5 octaves from the note currently played.
- Drive: Overdrive the sub oscillator. This adds extra harmonics to the sine.
- Filter: Mix the sub oscillator output between Filter 1 and 2. 100/0 means the output goes completely to filter 1. While 0/100 means the output goes completely to filter 2. Values in between mean the output is mixed between both filters.
The Sample Player
The sample player in Sektor supports playback of single samples (wav files) as well as multi samples which have been expertly recorded across the range of keys. The sample player also seamlessly supports Heat up 2 instruments. If you own Heat Up 2 all your instruments will automatically show up in the sample selection menu.
Sample Settings: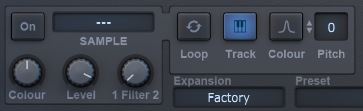
- On: Turn the sample player On or Off. If you don’t need this then turn it Off rather than bringing the level all the way down to save CPU usage.
- Sample Selection Display: Load a sample. Click the center of the screen to open a drop down menu to select a sample. Or use the previous and next buttons (shown while hovering).
- Colour Amount: A bandpass filter which narrows the frequency range of the sample. Has no effect unless Colour is On.
- Level: Attenuate the output level of the sample in decibels.
- Filter: Mix the sample output between Filter 1 and 2. 100/0 means the output goes completely to filter 1. While 0/100 means the output goes completely to filter 2. Values in between mean the output is mixed between both filters.
- Loop: Continuously loops the sample back to the start when it reaches the end. This has no effect for multi samples.
- Track: Key tracking, Plays the sample back at the pitch of the note played. When off the original sample is played back and will not be pitched correctly to the current note being played. Multi samples are always played back at the correct pitch. Therefore this has no effect for multi samples.
- Colour On: Enables the colour knob. The colour knob is a bandpass filter which narrows the frequency range of the sample.
- Pitch: Detune the sample from the current note played in semitones.
 The Filter section
In Sektor we have two separate filters. The oscillators have a filter mix knob which controls the amount of the signal to send to each filter. By default all oscillators are sent to filter 1. To send for instance Osc B to filter 2 we simply move its filter mix knob all the way to the right to send 100% of Osc B to filter 2. We can split the output of the oscillator between both filters by setting the mix to 50/50.
Each filter comes with its own AHDSR envelope which directly controls the filter cutoff. This is a quick and handy way of modulating the cutoff without having to route one of the ADSRs or Mod envelopes. To active this AHDSR envelope we must set the “Env” amount, to deactivate it we simply set the env amount back to zero (center), the Env knob controls the amount of the envelope to apply to the cutoff. The env amount can be negative which will invert the envelope.
Filter Settings:
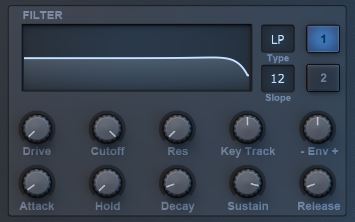
- Filter Display: Shows the shape of the current filter. You can also drag the display to easily change the cutoff and resonance amount.
- Type: Select filter type. LP = Lowpass, HP = Highpass, BP = Bandpass. Lowpass Allows all frequencies below the cutoff frequency to pass. Highpass allows all frequencies above the cutoff frequency to pass. Bandpass cuts frequencies from above and below the cutoff frequency depending on the resonance level.
- Slope: Set filter slope in decibels per octave. 24dB gives a steeper filter curve and so will attenuate the frequencies at the cutoff more strongly.
- Drive: Overdrive the signal directly before entering the filter. This will push the filter harder and fatten the sound of the filter.
- Cutoff: Filter cutoff frequency in hertz. Set the frequency at which the filter starts to attenuate the frequencies of the signal.
- Res: Filter Resonance. Increase or decrease the narrow band of frequencies around the cutoff frequency.
- Key Track: Filter Key tracking. Uses the frequency of the current note played to determine at what frequency the cutoff will start taking effect. Makes the filter sound more dynamic while playing as each note will have a cutoff frequency that relates directly to that note. Setting to 0% will make the filter behave more like a static EQ and will attenuate the signal at the exact same cutoff frequency for every note played.
- Env: Envelope Amount. The Envelope (AHDSR) is directly routed to the filter cutoff. Use this knob to control the amount that the envelope affects the filter cutoff. Increase in the + positive direction to control the amount. Decrease in the – minus direction to set the amount while inverting the envelope.
- Attack: Set the attack time for the filter cutoff. Maximum attack time is 10 seconds. Has no effect unless the Env amount is set.
- Hold: Set the Hold time for the filter cutoff. Maximum hold time is 4 seconds. Has no effect unless the Env amount is set.
- Decay: Set the Decay time for the filter cutoff. Maximum decay time is 10 seconds. Has no effect unless the Env amount is set.
- Sustain: Set the Sustain amount for the filter cutoff as a percentage of the range of the envelope. Has no effect unless the Env amount is set.
- Release: Set the Release time for the filter cutoff. Maximum release time is 10 seconds. Has no effect unless the Env amount is set.
Modulation and routing
Modulation is a massively important part of sound design. Without it a synth would sound incredibly boring and static. The key to creating natural or even experimental sounds is that the sound is changing over time. This could be a lowpass filters cutoff being modulated by an envelope giving a nice bass sound where the highest frequencies dampen over time, or modulating the pitch of a sine wave giving a nice kick sound. These are basic sound design examples but Sektor allow you to go much further with a range of modulation options routable to practically every knob. Sektor has many modulation sources such as ADSR envelopes, Advanced Graphical Envelopes, LFOs, Expression Envelopes and macros knobs. In this section we will give an overview of each Modulation source and it’s features as well as showing the different way of routing sources to destinations.

The Expression page:
The expression page contains 8 graphical envelopes. These are used to shape certain parameters from your midi keyboard, such as velocity, after touch, mod wheel and key tracking. More parameters are available when in MPE (Multidimensional Polyphonic Expression) Mode.
Each expression envelope can be routed to any knob in Sektor that can be modulated. So to route for instance velocity to the filter 1 cutoff, we first set the source of an envelope to velocity and then drag from the “Dest” button to the cutoff knob. Now we can change the shape of the envelope to change how the velocity affects the cutoff.
The benefit of 8 freely assignable envelopes is that now we can have multiple envelopes for the same source. So we can set both envelope 1 and 2 to velocity but route them to different destinations with different shapes. Also each envelope can have up to 4 destinations, click the “Dest” button to show the destination list, drag and drop from these to a knob, or click and select a destination from the menu.
Expression Settings:
- Envelope Display: Double click to add points, left click and drag in between points to drag the curve. Right click a point to delete it. Right click anywhere else for a polarity menu either positive, negative or bipolar.
- Source menu: Select your source from the list.
- Dest: Click to show a list of 4 possible destination slots for the envelope. Click and drag directly from the “Dest” button to a destination to route the envelope or use one of the slots directly.
 The ADSR Envelopes:
In Sektor we have two routable ADSR envelopes, each one has up to 4 possible destinations available. Each destination has an amount knob which has both positive and negative range. We can also enable or disable a destination.
ADSR Settings:
- Att: Envelope attack time.
- Dec: Envelope decay time.
- Sus: Sustain level.
- Rel: Envelope release time.
- Destinations: 4 slots to set as destinations for the ADSR. Drag and drop directly from the slot to a knob to set as destination, or simply click and select a destination from the menu.
- Amount: Knob setting the amount of the source to send to the destination.
- Enable: Enable or disable the destination slot.
 The Modulation Envelopes:
We have 3 graphical modulation envelopes in Sektor. These are really powerful and allow you to shape your modulation in very specific ways, it also syncs easily with the host tempo and time signature. Each numbered line in the grid represents a beat. To sync with these beats we can set the “Sync” to anything other than free. Sync changes the grid and will snap any point you move to the grid lines. If you don’t need to sync to the grid make sure to set “Sync” to free. As with every other modulator we have 4 destination slots, build in right next to the Envelope.
Modulation Envelope Settings:
- Envelope display: Double click to insert new points. Right click a point to open a menu to delete the point or set as loop end/start if in Loop mode. Click and drag a curve to change it.
- Sync: Set the sync mode. This will update the grid, for instance “fifths” would divide each beat into 5 parts, quarters would divide each beat into 4 parts, when moving a point it will snap exactly to the grid lines shown. To have no snapping and hence no sync then set Sync to free.
- Mode: Mode sets the envelope behaviour. Available modes are “One shot” , “Loop”, “Loop-Rel” and “Sustain”. One shot is an envelope without a sustain or a release, it just plays from start to finish. Loop mode will just constantly loop between the start and end loop points. Loop-Rel mode is the same as Loop but when a user releases a key the envelope will switch straight to the release point ( also the Loop end point) and carry on from there. Meaning you can create a different shape for the release part of the sound. Sustain mode works more like a normal envelope, the envelope runs until the sustain point where it is held until the user then releases a key, triggering the release stage.
- Trigger: Sets the trigger mode. There are two options, “First Note” and “Every Note”. Every note is the trigger mode you will most commonly use. With every note the envelope retriggers and starts from the beginning, this is the common behaviour of an envelope. First note means that the envelope will only retrigger on the first note played. So if you press one note keep it held down then press another note, the note you just pressed will not retrigger it’s envelope and instead will sync with the envelope of the first note played. Only when all notes are released will the envelope retrigger again.
- Polarity: Set the polarity of the envelope. Changes the envelope display giving visual feedback of the different modes. Modes include Positive, negative and bipolar. Positive is the standard envelope shape with only positive values. Negative inverts the shape of the envelope to use only negative values. Bipolar makes the shape run through both negative and positive values.
- Envelope Preset Manager: Select a envelope preset from the menu or use the previous and next arrow buttons to browse. Use the save button to save your own unique envelope presets.
- Destinations: up to 4 destination slots. Control the amount, enable or disable a destination.
 The LFOs (Low Frequency Oscillators)
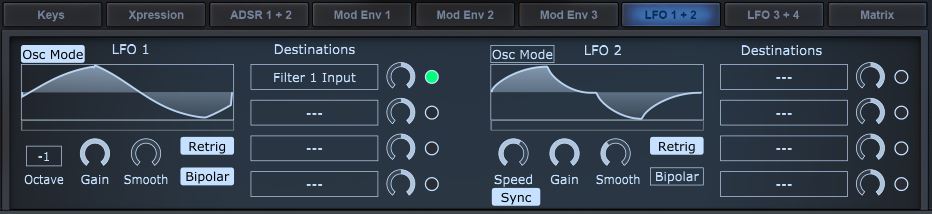
In Sektor there are 4 available LFOs or Low Frequency Oscillators. These LFOs are not strictly low frequency, we also have an osc mode which turns the LFO into a fully fledged bandlimited oscillator. This oscillator can be use the same way as an LFO to modulate settings in Sektor, or by clicking one of the destination slots to open the menu and going to “Filter 1 > Filter 1 input” we can route the oscillator directly to the filter, using it as an extra sound source. When routing to the filter input be sure that bipolar is on, if bipolar is off this will add a DC offset to the output.
LFO Settings:
- Osc Mode: Turns the LFO into a fully bandlimited oscillator. When On the speed knob and sync are hidden and replaced with an octave control.
- Waveform Display: Click the display to get a popup menu of the available waveforms. Hovering over the display shows previous and next buttons, use these to quickly browse the waveforms.
- Phase: Click and drag in the small rectangular box below the display to set the phase of the waveform. This is the start position when the LFO retriggers.
- Speed: Speed is in hertz (Cycles per second), unless sync is activated. When sync is activated the speed is set to sync to the host BPM and the format changes to, for example 1/4, where the 1 represents a bar and the 4 represents beats. In the case of 1/4 speed then, what this actually means is that the LFO will complete its cycle 4 times per bar. If we consider another speed such as 2/1 what this means is that the LFO will complete its cycle only once over the period of 2 bars. Some of the speeds in sync mode have a T or a D next to them, for example 1/4T or 1/4D. T stands for triplets and D stands for Dotted timings. These affect the cycle speed of the LFO in the following ways: Triplets means that for every 2 cycles we actually get 3 cycles, so if 1/2 is 2 cycles over one bar then 1/2T gives a speed of 1/3, 1/4T then gives 1/6 and 1/8T gives a timing of 1/12. Dotted timings means that each cycle is extended by half a cycle. So each cycle of the LFO is extended by 50%. So for example a timing of 1/4D is equivalent to 1/(4/1.5) or approximately 1/2.666666666. So that means 1/4D is 2.66666 cycles over 1 bar.
- Sync: When sync is on the speed of the LFO is synced to the host. See Speed above for more details.
- Octave: Only available when Osc Mode is On. Detune the oscillator from the currently played note in octaves.
- Gain: Basic linear gain controlling the output level of the LFO before the destination amount is set.
- Smooth: Smooth the edges of the waveform.
- Retrig: Retriggers the LFO to the start phase position on every note when On. When off the LFO becomes a free running global LFO that is never retriggered and so every note played uses the same LFO.
- Bipolar: When on the LFO oscillates between negative and positive values, if routing an LFO in Osc mode to a filter input, bipolar should be on to avoid a DC offset. When off the LFO has strictly positive values only.
- Destinations: up to 4 destination slots. Control the amount, enable or disable a destination.
- Destination Amount: Controls the amount of the LFO to send to a destination. When routing an LFO to the pitch of an oscillator the range of the amount knob automatically changes to -48 to +48 , this range relates to semitones, so 48 is equal to 4 octaves.
 The Modulation Matrix
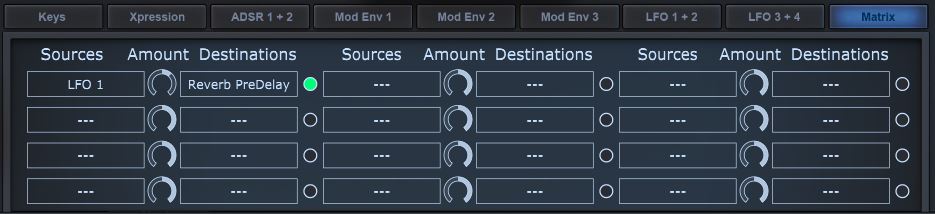
The modulation matrix is one of many ways to route sources to destinations in Sektor. The matrix has 12 available slots, each with a source, amount, destination and Enable button.
Clicking the source button gives a menu containing all available sources. The amount control can also be negative inverting the source. To select a destination either click the destination button and select from the menu or drag and drop directly from the button to the knob you would like to modulate. A knob will glow while hovering over it while dragging, this indicates it can successfully be used as a destination.
Modulation Matrix Settings:
- Sources: All available sources in Sektor.
- Amount: Set the amount of the source to send to the destination. Can be negative, inverting the source.
- Destination: List of all destinations. Or drag and drop directly to a knob to set the destination.
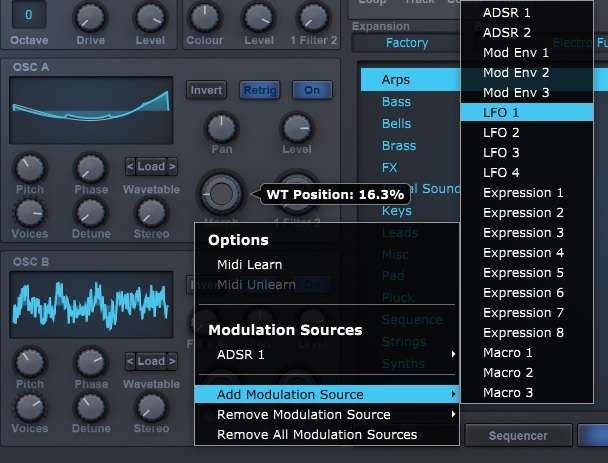
Routing via a knobs right click menu
We can also easily add sources to destinations via the right click menu of any knob that is a destination.
Right clicking a knob shows a menu, the first part of the menu is for midi learn. The second part under Modulation sources contains everything we need to enable or disable a source, add a source, remove a source or remove all sources at once.
This is one of the simplest ways of assigning sources to destinations.
 The Macro knobs
In Sektor we have 3 Macro knobs, these can be used to control multiple parameters at once using just one knob. We can also give each knob its own name by clicking the name below.
Route a macro knob to any other knob by using that knobs right click menu, or you can set the macro as a source in the matrix and route to your destination knob from there.
 The Sequencer
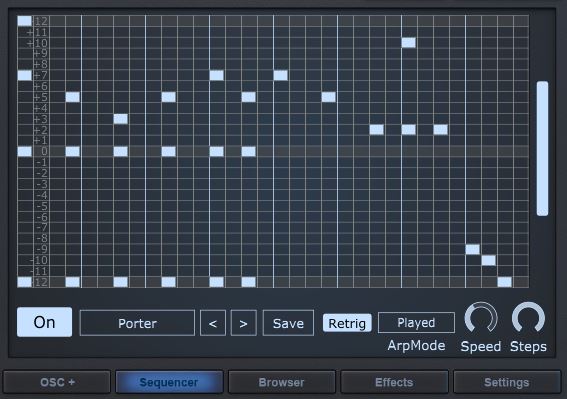
Sektor comes with a super powerful yet easy to use sequencer. It is more like a sequencer, piano roll and arpeggiator combined. The sequencer has a maximum of 32 steps with a note range of 4 octaves allowing for very complex melodies to be created.
Each horizontal line is numbered starting at 0 in the center and going to +24 upwards and -24 downwards. The center of the sequencer represents the current note held, ie the base note. The numbers are semitones so when we add a note at say +2 this is the base note plus 2 semitones. So if the base note is a C on your keyboard the note at +2 will play a D because +1 semitone would be C# and so +2 is then D. Because 12 semitones makes an octave then +12 would be C one octave higher.
Using the sequencer grid:
Adding and moving notes: Left click anywhere on the grid to add a note to the sequencer, clicking and dragging a note will move it around. You can also easily paint in many steps at once by adding a note and then dragging.
Deleting notes: Right clicking a note will delete it, right clicking and dragging will delete that note and all notes that are in the path of your drag.
Changing Note length: Left click and drag the right edge of a note to extend or shorten that note. When hovering over the right edge of a note the mouse cursor will change indicating that the edge can be dragged.
Sequencer Settings:
- On: Enable or disable the sequencer. Note that if the sequencer is on but no notes are in the sequencer grid then Sektor will output silence.
- Preset Manager: Load a preset from the menu or use the previous and next arrow buttons. Save your own sequencer preset.
- Retrig: When retrigger is on, the sequencer will always start from the beginning of the sequence for the first note played. When off the sequencer is free running, which means even when a note is not playing the sequencer is still silently running in the background. When you play a new note the sequencer will carry on from the position in the sequence it would have been at if the note was still held. This can be used for interesting note progressions during the sequence or gaps as the sequencer will not start from the beginning for every new first note.
- Arp Mode: When holding multiple notes at once the notes will be arpeggiated based on this setting. Played means that the notes are arpeggiated based on the order of the notes played. Up means the notes are arpeggiated in order of lowest note to highest. Down means highest to lowest. While Up Down means lowest to highest followed be highest to lowest and vice a versa for Down Up.
- Speed: Set the speed of the sequencer. First number represents the number of bars and the second number represents beats. So for instance 1/4 means 4 beats per bar. The T in 1/4T stands for triplets while the D in 1/4D dotted timings.
- Steps: Set the number of steps this sequence will loop over.
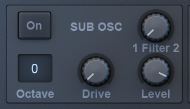
 The Effect Racks
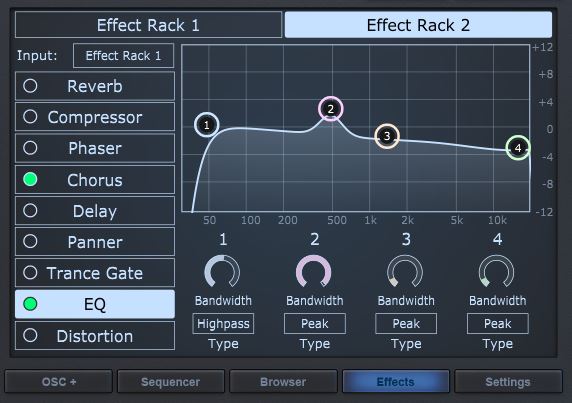
In Sektor we have 2 effect racks which contain 9 high quality effects. These are Reverb, Compressor, Phaser, Chorus, Delay, Panner, Trance Gate, EQ and distortion. Each effect can be reordered in the list via drag and drop. Reordering effects can be a very useful sound design tool. For instance you can set a bitcrusher before or after the reverb, if it is before the reverb then the whole signal going into the reverb is bit crushed but the reverb tail is not. When we place bit crush after the reverb then the reverb tail is also bit crushed which can be an interesting effect. Likewise with compression we may want to compress the signal before a reverb but avoid compressing the reverb tail, so we set it before; Placing it after the reverb will also compress the reverb tail. In these cases the sound can end up being quite different. So play around with the effect order. The changes are updated in realtime, move an effect around and listen if there is a significant difference, certain orders of effects might sound better to you than others.
Two effect racks?
Each effect rack has an input, for Effect rack 1 inputs can be Filter 1 + 2, Filter 1 or Filter 2. For effect rack 2 the inputs can be None, Filter 1 + 2, Filter 1, Filter 2 or Effect Rack 1. How this works is that each sound source (Osc A and B, Sub Osc and sampler) is sent to a filter via the Filter Mix knob. With this knob we can send the sound to Filter 1 (fully left 100/0) or to filter 2 (fully right 0/100) or a mixture of both, for example 50/50. Then in the effect rack we can choose the input, which is the filter we want to send into the effect rack.
The effect racks then can run in parallel or serial modes. Serial mode is simple, when we set the effect rack 2 input to “Effect rack 1” now the output of the first effect rack feeds the input of the second, meaning we now can apply an extra reverb, compressor ect to the signal even if we already set them in effect rack 1. We then have 2 reverbs or compressors affecting the sound.
Parallel mode can be achieved by setting say, Osc A to filter 1 and then Osc B to filter 2. Then in effect rack 1 we set input to “Filter 1” and in effect rack 2 we set the input to Filter 2. Now we have two completely separate signal chains. A completely different set of effects can be applied to Osc A and Osc B.


The Settings
The settings page is split into 2 parts, General and GUI Colours. The general tab is where we can select our skin, enable rainbow or MPE Mode and learn more about Sektor.
The general Tab:
Rainbow mode: Changes Modulation colour and piano key colour when pressed based on the average output level of the synth.
MPE Mode: MPE (Multidimensional Polyphonic Expression) is a new midi standard which Sektor supports. Turn this ON if you have an MPE keyboard such as the Seaboard Rise by Roli to get the most out of it. If you don’t have such a keyboard leave this feature off. This setting is saved per preset. Some DAWs might not support MPE, or might need extra steps to get working correctly. When MPE Mode is enabled more midi parameters are available in the Expression Envelopes, such as MPE Slide, MPE Glide, MPE Lift and MPE Strike. Route these to any destination to take advantage of the expressiveness of MPE.
About Sektor: Credits for the people who worked on Sektor, the latest Sektor version number will always be shown here.
The GUI Colours Tab:
In the GUI colours tab we can visually change the colours of different elements of Sektors interface, allowing you to change the colours to ones you may prefer. Any colours you change are saved automatically for the current skin you have selected. Lots of elements can be changed colour such as the white keys of the keyboard, the main screen colour and even the Sektor and Initial logos.

The Preset Browser and Expansions page
The preset browser is organised into categories on the left side and presets on the right. Above the screen is a button to select an expansion and a button to select a preset from the currently selected category. Previous and next buttons allow quick and easy auditioning of presets.
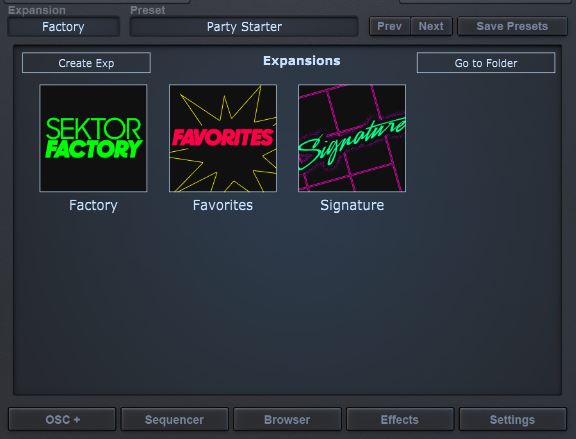
Within the browser page we can right click any preset to set it as a favorite, this adds a star next to the preset and then adds the preset to the “Favorites” Expansion. The favorites expansion is where all your favorite presets are stored for easy access. Click the Expansion button in the left corner to open the Expansions page, from here we can select the Favorites expansion or any other you may have.
An Expansion in Sektor contains content such as presets, samples, LFOs, Sequencer presets, Mod envelope presets, Wavetables and skins. It is up to the creator of the expansion what they choose to include, but at the very least it should contain new preset sounds.
Creating an Expansion
Creating your own expansion is simple, click the “Create Exp” button on the Expansion page, enter your Name for the expansion then hit Enter/Return. Now an extra Expansion has been added to the list with your name and a custom image. If you click the expansion created you will be taken back to the preset browser, here you have 4 categories which are added automatically. Bass, Lead, Pad and Pluck.
Adding and deleting categories
Adding or deleting categories is done via your computers file system. Go to the Expansion page (click the “Expansion” button, top left above the screen) and now click “Go to folder”. This will open the folder which contains all your expansions for Sektor. Go into any Expansion folder and open the folder named “Presets”. Here you can add any Categories by creating folders or delete them.
Adding presets to your Expansion
In the preset browser select a category which you wish to save a preset too. If for instance you are planning to create a Bass preset, best to select the Bass category. Now you can modify the controls of Sektor and design your own bass sound. Now click the “Save Presets” button. This will open your computers file system. The starting folder to save the preset to will be the Bass category of your expansion. Simply give the file you are saving a name and press “OK” or Save to confirm. Now the preset you created will show up in the preset browser under the Bass category.
Adding extra content to your expansion
In Sektor an expansion contains all your content in one place making it easy to share with others. Each Expansion has a set of folders which contain a certain type of content. Each expansion has these folders: LFOs, Mod Envs, Sequencer, Presets, Skins, Samples and Wavetables. The folders Presets, Mod Envs and sequencer are used to save the presets you make within Sektor. We described before how to save a preset to the Bass category of your expansion. When you save a sequencer preset or a modulation Envelope preset these get saved in there corresponding folders: Sequencer and Mod Envs.
Adding Samples:
We can also add samples to the expansion by simply placing any samples you might have to the samples folder. If you plan to share an expansion and have added samples to it, make sure you have the legal right to do so, you should own the copyrights to the sample or the sample should be public domain, meaning you can freely share it.
Adding LFOs:
You can also add your own LFOs to the LFOs folder. These are simply single cycle waveforms. There is a limitation though. Each waveform must be a power of two in sample size, so for instance 512, 1024, 2048 and 4096 are valid sample lengths. The maximum size for a single cycle is 4096.
Adding wavetables:
In a future version of Sektor we have plans to add a wavetable and LFO designer into the interface. For now you can create your own wavetables by placing single cycle waveforms inside a folder with the name format “Your Wavetable.wt” Notice the .wt on the end. Check the Wavetable folder of the Factory expansion for an example of this in action. Inside each “.wt” folder we place the single cycle waveforms. We recommend a maximum of 20-30 waveforms per table and a size of 2048 sample size, this is to avoid too long loading times. To keep a set order for the waveforms in the table each waveform should be alphabetically named or appended with a number, for example the names could be wave01, wave02, wave03, which will keep them in the order desired.
Changing the expansion Image:
When creating a new expansion it gets set the default custom expansion image. This can be changed. When you go into your expansion you will see a png image file that has the same name as the expansion. Change the image by replacing this one.
*Important* The name of the image must always match the name of the expansion. If you change the expansion name after creating it you must also change the images name to match exactly. Also for best results keep the dimensions of the image the same as the original image.

Adding a new Skin:
Making a whole new skin for Sektor is too an involved process to add to this User Guide, we made a handy video showing how this can be done quite easily using Photoshop: How to Skin Sektor
Exporting your Expansion for sharing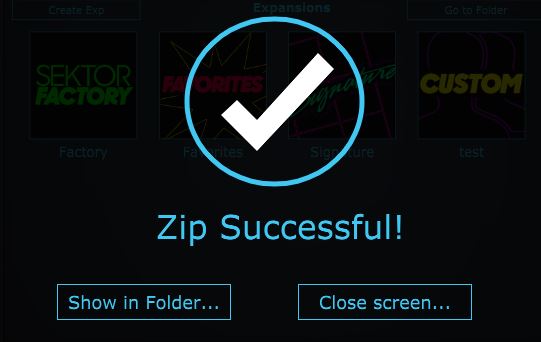
So you have finished your expansion and want to share it with the world? Within Sektor we have a very simple way of turning your entire expansion into a single file for easy sharing with your friends or customers. On the Expansion page simply right click the expansion that you made and select the option “Make into single file for sharing…”. Now the expansion is made into a single file which has the file extention, .sektorExpansion. Do not close Sektors interface while the expansion is being made into a single file ( usually it is super fast unless you added lots of samples), if successful you will get the “Zip successful!” screen. Either close the screen or show the single file in the folder by clicking “Show in folder…”. The single expansion file is saved next to the original Expansion in the Sektor/Expansions folder. Also accessible via the “Go to Folder” button of the Expansions page.
*Important* do note change the name of the Sektor expansion file after creation! This can cause issues during install, the sektor Expansion file must have the exact same name as the original expansion.
Importing/installing an Expansion
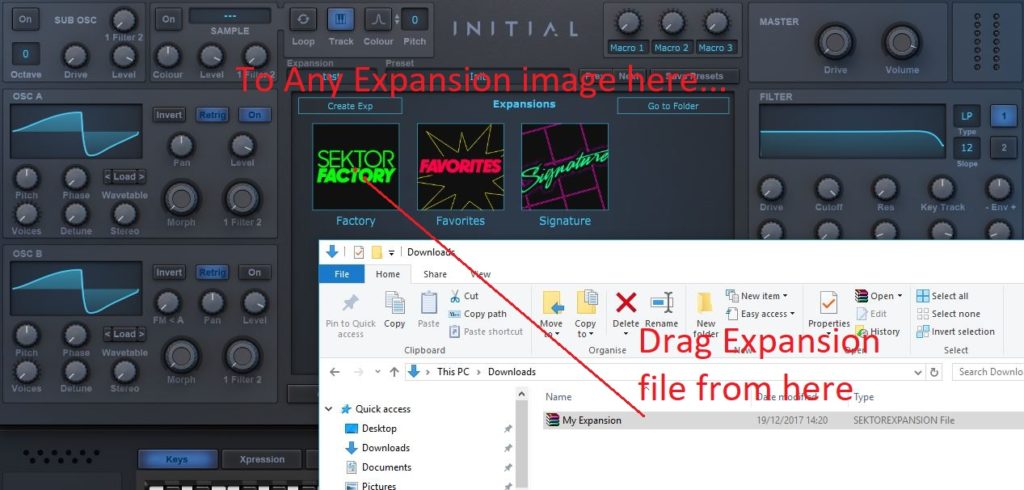
When downloading an expansion by a 3rd party there is a super simple way to install the expansion. First Locate the sektorExpansion file. Then drag and drop it on to any existing expansion image. The expansion and all its contents are now available in Sektor!
You can buy new expansions pack from initialaudio.com or from any 3rd party website which offers them.