 Heat Up 3 User Guide

Heat Up 3 is a modern rompler/Sample player plugin and comes with over 850 instruments.
Designed for ease of use and sound quality, Heat Up comes with lots of features and effects to help shape your own unique sound. In this user guide we will go over Heat Ups main features and how to use them.
For many users selecting a sound in the browser and starting to play will be all you need to know and Heat Up 3 operates very well as a simple preset player, but dig a bit deeper and Heat Up 3 has a lot of really cool features to help shape a sound and make it your own. From the expression page, which enables a user to route many expressive dimensions such as velocity and after touch to any knob, to the ADSRs and LFOs which enable an element of sound design. Heat Up also has a reorderable effect rack with cool effects such as reverse as well as a Sample layer where we can set an “Atmosphere” these are samples such as vinyl and tape hiss to things like wind and rain, adding an extra dimension to the instrument. This guide will take you through all the features and how to make the most of them.
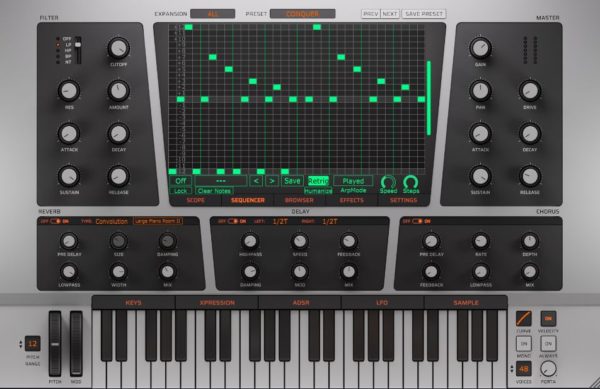
The Filter Section
On the top left side of Heat up we have the Filter section. This is a ZDF Filter (Zero Delay Feedback) and has 4 filter types , Lowpass, Highpass, Bandpass and Notch. The filter comes with its own ADSR envelope which directly controls the filter cutoff. This is a quick and handy way of modulating the cutoff without having to route one of the other ADSRs. To activate this ADSR envelope we must set the “Env Amount”, to deactivate it we simply set the amount back to zero (center), the Amount knob controls the amount of the envelope to apply to the cutoff. The env amount can be negative which will invert the envelope.
Filter Settings:
- Type: Select filter type.Off = bypass the filter, LP = Lowpass, HP = Highpass, BP = Bandpass. NT = Notch. Lowpass Allows all frequencies below the cutoff frequency to pass. Highpass allows all frequencies above the cutoff frequency to pass. Bandpass cuts frequencies from above and below the cutoff frequency depending on the resonance level. Notch cuts the frequencies around the cutoff frequency depending on resonance level.
- Cutoff: Filter cutoff frequency in hertz. Set the frequency at which the filter starts to attenuate the frequencies of the signal.
- Res: Filter Resonance. Increase or decrease the narrow band of frequencies around the cutoff frequency.
- Env Amount: Envelope Amount. The Envelope (ADSR) is directly routed to the filter cutoff. Use this knob to control the amount that the envelope affects the filter cutoff. Increase in the + positive direction to control the amount. Decrease in the – minus direction to set the amount while inverting the envelope.
- Attack: Set the attack time for the filter cutoff. Maximum attack time is 10 seconds. Has no effect unless the Env amount is set.
- Decay: Set the Decay time for the filter cutoff. Maximum decay time is 10 seconds. Has no effect unless the Env amount is set.
- Sustain: Set the Sustain amount for the filter cutoff as a percentage of the range of the envelope. Has no effect unless the Env amount is set.
- Release: Set the Release time for the filter cutoff. Maximum release time is 10 seconds. Has no effect unless the Env amount is set.
The Master Section
On the top right side we have the master section. Here we can adjust output gain, pan left or right in the stereo field, set some overdrive and control the overall envelope of the instrument. Heat Up also has a built in high quality limiting algorithm. The limiter prevents the output ever going above zero decibels, which without a limiter would result in unwanted distortion (clipping). The LED output meters show the current output level, this is not meant to be massively accurate and is just a guide of the current level. When the meters turn red this means that internally Heat Up 3s output is going beyond zero decibels and clipping. When this is the case the limiter will kick into action ensuring that the output that is passed to your DAW is no higher than zero decibels. The benefit of this limiter is you can play as many notes as you like at once with the gain set high and it will never sound distorted or bad. Of course if you want distortion then you can set the overdrive or the distortion in the effect rack.
Master Settings:
- Gain: Set the overall volume of the synth. Range is in decibels.
- Pan: Pan the output to the left or right of the stereo field.
- Overdrive: Overdrive the entire output. Adds extra harmonics to the instrument making it sound “Fatter” or “Warmer”.
- Attack: Attack time for the level of each note played.
- Decay: Decay time for the level of each note played.
- Sustain: Sustain level for each note played.
- Release: Release time for the level of each note played.
 The Sequencer
Heat Up 3 comes with a super powerful yet easy to use sequencer. It is more like a sequencer, piano roll and arpeggiator combined. The sequencer has a maximum of 32 steps with a note range of 4 octaves allowing for very complex melodies to be created.
Each horizontal line is numbered starting at 0 in the center and going to +24 upwards and -24 downwards. The center of the sequencer represents the current note held, ie the base note. The numbers are semitones so when we add a note at say +2 this is the base note plus 2 semitones. So if the base note is a C on your keyboard the note at +2 will play a D because +1 semitone would be C# and so +2 is then D. Because 12 semitones makes an octave then +12 would be C one octave higher.
Using the sequencer grid:
Adding and moving notes: Left click anywhere on the grid to add a note to the sequencer, clicking and dragging a note will move it around. You can also easily paint in many steps at once by adding a note and then dragging.
Deleting notes: Right clicking a note will open a menu with the option to delete it.
Creating a Reverse Note: Right click a note to open the menu and select “Reverse”. Reverse plays the note backwards! This can be set for any note and works best on pianos or any instrument that changes over time. For basic bass sounds or synth sounds it might not have much noticeable effect.
Changing Note length: Left click and drag the right edge of a note to extend or shorten that note. When hovering over the right edge of a note the mouse cursor will change indicating that the edge can be dragged.
Sequencer Settings:
- On: Enable or disable the sequencer. Note that if the sequencer is on but no notes are in the sequencer grid then Heatup will output silence.
- Preset Manager: Load a preset from the menu or use the previous and next arrow buttons. Save your own sequencer preset.
- Retrig: When retrigger is on, the sequencer will always start from the beginning of the sequence for the first note played. When off the sequencer is free running, which means even when a note is not playing the sequencer is still silently running in the background. When you play a new note the sequencer will carry on from the position in the sequence it would have been at if the note was still held. This can be used for interesting note progressions during the sequence or gaps as the sequencer will not start from the beginning for every new first note.
- Arp Mode: When holding multiple notes at once the notes will be arpeggiated based on this setting. Played means that the notes are arpeggiated based on the order of the notes played. Up means the notes are arpeggiated in order of lowest note to highest. Down means highest to lowest. While Up Down means lowest to highest followed be highest to lowest and vice a versa for Down Up.
- Speed: Set the speed of the sequencer. First number represents the number of bars and the second number represents beats. So for instance 1/4 means 4 beats per bar. The T in 1/4T stands for triplets while the D in 1/4D dotted timings.
- Steps: Set the number of steps this sequence will loop over.
- Clear Notes: Clear all notes in the grid, easier than deleting each note individually if you are wanting to start a pattern from scratch.
- Lock: Lock the sequencer during preset change. When lock is enabled the sequencer will keep its current settings when changing preset. So any settings from another preset will be ignored. Useful when you have a nice sequence going and want to change the sound only.
- Humanize: Adds variation to the timing and velocity of each note in the sequencer. This gives a more natural feel like being played by a human being.
- Save: Save your own custom sequencer preset.
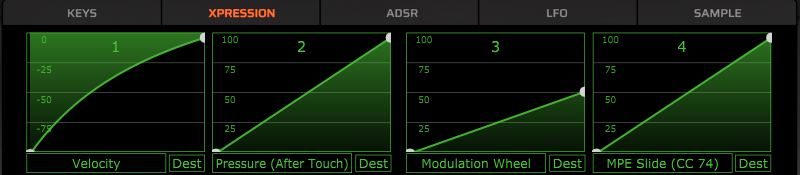 The Expression page
The expression page contains 4 graphical envelopes. These are used to shape certain parameters from your midi keyboard, such as velocity, after touch, mod wheel and key tracking. More parameters are available when in MPE (Multidimensional Polyphonic Expression) Mode.
Each expression envelope can be routed to any knob in Heat Up that can be modulated. So to route for instance velocity to the filter cutoff, we first set the source of an envelope to velocity and then drag from the “Dest” button to the cutoff knob. Now we can change the shape of the envelope to change how the velocity affects the cutoff.
Most instruments in Heat Up already have velocity routed to the filter cutoff, this is especially crucial for realistic sounding pianos. The softer you strike the key the more “Dampened” it sounds.
The benefit of 4 freely assignable envelopes is that now we can have multiple envelopes for the same source. So we can set both envelope 1 and 2 to velocity but route them to different destinations with different shapes. Also each envelope can have up to 4 destinations, click the “Dest” button to show the destination list, drag and drop from these to a knob, or click and select a destination from the menu.
Expression Settings:
- Envelope Display: Double click to add points, left click and drag in between points to drag the curve. Right click a point to delete it. Right click anywhere else for a polarity menu either positive, negative or bipolar.
- Source menu: Select your source from the list.
- Dest: Click to show a list of 4 possible destination slots for the envelope. Click and drag directly from the “Dest” button to a destination to route the envelope or use one of the slots directly.
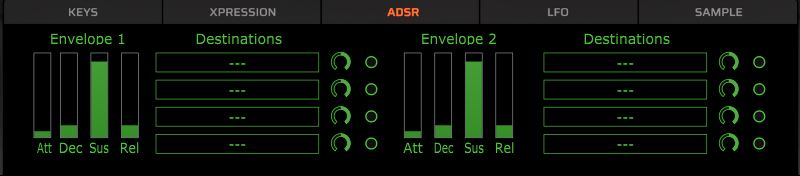 The ADSR Envelopes
In Heat Up we have two routable ADSR envelopes, each one has up to 4 possible destinations available. Each destination has an amount knob which has both positive and negative range. We can also enable or disable a destination.
ADSR Settings:
- Att: Envelope attack time.
- Dec: Envelope decay time.
- Sus: Sustain level.
- Rel: Envelope release time.
- Destinations: 4 slots to set as destinations for the ADSR. Drag and drop directly from the slot to a knob to set as destination, or simply click and select a destination from the menu.
- Amount: Knob setting the amount of the source to send to the destination.
- Enable: Enable or disable the destination slot.
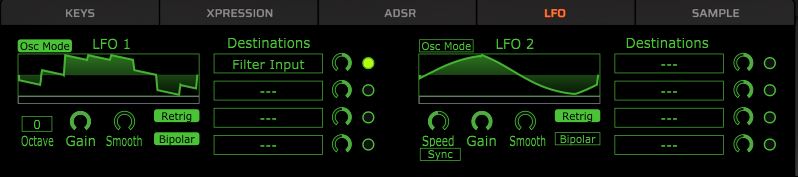 The LFOs (Low Frequency Oscillators)
In Heat Up 3 there are 2 available LFOs or Low Frequency Oscillators. These LFOs are not strictly low frequency, we also have an osc mode which turns the LFO into a fully fledged bandlimited oscillator. This oscillator can be use the same way as an LFO to modulate settings in Heat Up 3, or by clicking one of the destination slots to open the menu and going to “Filter > Filter input” we can route the oscillator directly to the filter, using it as an extra sound source. When routing to the filter input be sure that bipolar is on, if bipolar is off this will add a DC offset to the output.
LFO Settings:
- Osc Mode: Turns the LFO into a fully bandlimited oscillator. When On the speed knob and sync are hidden and replaced with an octave control.
- Waveform Display: Click the display to get a popup menu of the available waveforms. Hovering over the display shows previous and next buttons, use these to quickly browse the waveforms.
- Phase: Click and drag in the small rectangular box below the display to set the phase of the waveform. This is the start position when the LFO retriggers.
- Speed: Speed is in hertz (Cycles per second), unless sync is activated. When sync is activated the speed is set to sync to the host BPM and the format changes to, for example 1/4, where the 1 represents a bar and the 4 represents beats. In the case of 1/4 speed then, what this actually means is that the LFO will complete its cycle 4 times per bar. If we consider another speed such as 2/1 what this means is that the LFO will complete its cycle only once over the period of 2 bars. Some of the speeds in sync mode have a T or a D next to them, for example 1/4T or 1/4D. T stands for triplets and D stands for Dotted timings. These affect the cycle speed of the LFO in the following ways: Triplets means that for every 2 cycles we actually get 3 cycles, so if 1/2 is 2 cycles over one bar then 1/2T gives a speed of 1/3, 1/4T then gives 1/6 and 1/8T gives a timing of 1/12. Dotted timings means that each cycle is extended by half a cycle. So each cycle of the LFO is extended by 50%. So for example a timing of 1/4D is equivalent to 1/(4/1.5) or approximately 1/2.666666666. So that means 1/4D is 2.66666 cycles over 1 bar.
- Sync: When sync is on the speed of the LFO is synced to the host. See Speed above for more details.
- Octave: Only available when Osc Mode is On. Detune the oscillator from the currently played note in octaves.
- Gain: Basic linear gain controlling the output level of the LFO before the destination amount is set.
- Smooth: Smooth the edges of the waveform.
- Retrig: Retriggers the LFO to the start phase position on every note when On. When off the LFO becomes a free running global LFO that is never retriggered and so every note played uses the same LFO.
- Bipolar: When on the LFO oscillates between negative and positive values, if routing an LFO in Osc mode to a filter input, bipolar should be on to avoid a DC offset. When off the LFO has strictly positive values only.
- Destinations: up to 4 destination slots. Control the amount, enable or disable a destination.
- Destination Amount: Controls the amount of the LFO to send to a destination.
The Effects
Heatup3 has 3 effects available on the main interface these are Reverb, Delay and Chorus. These effects are also in the effect rack, rather than being extra separate effects they remote control the effects in the rack, making them easier to tweak or turn On and Off.
Altogether there are 12 effects in Heatup3 these are, Reverb, Delay, Chorus, Phaser, Compressor, Vibrato, Tremolo, Panner, EQ, Trance Gate, Distortion and Reverse. Effects can be reordered via drag and drop in the list.